Views: 65
WordPress blocks are a new way to add content inside WordPress Post/Page editor. To know more about WordPress blocks visit our blog post titled “What Are WordPress Blocks – An Introduction”. In this blog post we will learn how to develop Hello World WordPress block using ESNext and JSX syntax. This block, when added in Post/Page editor will simply display a message saying “Hello World”.
Generating index.js and index.asset.php Files:
Since the Gutenberg project is developed in JavaScript so we need a run-time environment to test/develop WordPress blocks using NodeJS. For this we need to configure the development environment which will compile our ESNext and JSX syntax based WordPress block code to plain JavaScript code and will generate the index.js and index.asset.php files to be injected while registering the WordPress block. To learn more about JavaScript Build Setup visit the blog post titled “JavaScript Build Setup For Development of WordPress Blocks – NodeJS”.
- Download and install NodeJS
- CD into the folder where you want to create the project (wordpress block)
- Inside the folder, run the command npm init. Fill the necessary information. See following code (Code – Creating package.json File Using npm init Command:) for reference
- Run the command npm install –save-dev –save-exact @wordpress/scripts . @wordpress/scripts compiles the ESNext and JSX syntaxes used for the development of WordPress blocks into plain JavaScript code. The block code (in ESNext and JSX) will be written in src/index.js and the script will output the compiled code at build/index.js.
- To create Hello World block, create a folder named as src and inside that folder create a new file named as index.js (code for Hello World block will be inside this file). See reference code as following (Hello World Block Code – src/index.js)
- To build/compile this code we need to add the command (
"build": "wp-scripts build") in scripts section in package.json file - Now we can run the command: npm run build to compile the Test Block code to plain JavaScript.
- The command:
"start": "wp-scripts start"can be defined in scripts section in package.json file. This command doesn’t shrink the source file and hence very helpful while developing the block. Moreover, it monitors the changes in the files and reload the updated version when we hit the save button without compiling the code again.
Code – Creating package.json File Using npm init Command:
npm init

package name: (wpblocks)
version: (1.0.0)
description: Test WordPress Block
entry point: (index.js) build/index.js
test command:
git repository:
keywords:
author: Junaid Hassan
license: (ISC) GPL-2.0-only
About to write to E:\gitlab\wpblocks\package.json:

{
  "name": "wpblocks",
  "version": "1.0.0",
  "description": "Test WordPress Block",
  "main": "build/index.js",
  "scripts": {
    "test": "echo \"Error: no test specified\" && exit 1"
  },
  "author": "Junaid Hassan",
  "license": "GPL-2.0-only"
}


Is this OK? (yes) yes
Hello World Block Code – src/index.js:
import { registerBlockType } from '@wordpress/blocks';

const blockStyle = {
    backgroundColor: '#900',
    color: '#fff',
    padding: '20px',
};

registerBlockType( 'gutenberg-hello-world/hello-world-block', {
    title: 'Hello World Block',
    icon: 'universal-access-alt',
    category: 'layout',
    example: {},
    edit() {
        return <div style={ blockStyle }>Hello World (from the editor).</div>;
    },
    save() {
        return <div style={ blockStyle }>Hello World (from the frontend).</div>;
    },
} );
WordPress Plugin File For WordPress Block:
We will create a WordPress plugin file which will register our WordPress block in WordPress Gutenberg editor when the plugin is activated. To learn more about how to create a WordPress plugin, please visit our blog posts titled “How To Develop Custom WordPress Plugin from Scratch using OOP” and “WordPress Plugin Development Cheat Sheet”. Create a new file inside the project folder (created in previous step), name it as ‘index.php’ and add the following code in it.
<?php
/*
Plugin Name: Hello World Block
*/
function gutenberg_hello_world_register_block() {

    // automatically load dependencies and version
    $asset_file = include( plugin_dir_path( __FILE__ ) . 'build/index.asset.php'); //generated in previous step

    wp_register_script(
        'gutenberg-hello-world-block',
        plugins_url( 'build/index.js', __FILE__ ),
        $asset_file['dependencies'],
        $asset_file['version']
    ); // index.js file is generated in previous step

    register_block_type( 'gutenberg-hello-world/hello-world-block', array(
        'editor_script' => 'gutenberg-hello-world-block',
    ) );

}
add_action( 'init', 'gutenberg_hello_world_register_block' );
Adding Styles from External Style-Sheet
Previously, we have added the styles using blockStyle constant. We can also create external style-sheet to contain our CSS styles and then we can en-queue it as we en-queued the scripts in previous step. Class name for the block is generated based on the block name prefixed with wp-block-. In our case the class name will be wp-block-gutenberg-hello-world-hello-world-block. The class is added to the block by passing the className object in edit and save methods (see following code for reference).
import { registerBlockType } from '@wordpress/blocks';

const blockStyle = {
    backgroundColor: '#900',
    color: '#fff',
    padding: '20px',
};

registerBlockType( 'gutenberg-hello-world/hello-world-block', {
    title: 'Hello World Block',
    icon: 'universal-access-alt',
    category: 'layout',
    example: {},
    edit({ className }) {
        return <div className={ className }>Hello World (from the editor).</div>;
    },
    save() {
        return <div style={ blockStyle }>Hello World (from the frontend).</div>;
    },
} );
Now we can create editor.css & style.css files and define CSS styles using the generated class wp-block-gutenberg-hello-world-hello-world-block.
CSS Code – editor.css
.wp-block-gutenberg-hello-world-hello-world-block {
    color: green;
    background: #cfc;
    border: 2px solid #9c9;
    padding: 20px;
}
CSS Code – style.css
.wp-block-gutenberg-hello-world-hello-world-block {
    color: darkred;
    background: #fcc;
    border: 2px solid #c99;
    padding: 20px;
}
Now these CSS files can be en-queued using the wp-register-style method as follows:
    wp_register_style(
        'gutenberg-hello-world-editor',
        plugins_url( 'editor.css', __FILE__ ),
        array( 'wp-edit-blocks' ),
        filemtime( plugin_dir_path( __FILE__ ) . 'editor.css' )
    );

    wp_register_style(
        'gutenberg-hello-world',
        plugins_url( 'style.css', __FILE__ ),
        array( ),
        filemtime( plugin_dir_path( __FILE__ ) . 'style.css' )
    );

    register_block_type( 'gutenberg-hello-world/hello-world-block', array(
        'style' => 'gutenberg-hello-world',
        'editor_style' => 'gutenberg-hello-world-editor',
        'editor_script' => 'gutenberg-hello-world-block',
    ) );
Output – Admin Dashboard:

Output – Front End

Attributes and Editable Fields:
Currently, the text message “Hello World” is not editable. To make it editable we can use attributes and editable field (Rich Text component). Update the src/index.js code with following to make the text message editable. Make sure to compile the code so that the code in build/index.js and build/index.asset.php files are updated as well.
import { registerBlockType } from '@wordpress/blocks';
import { RichText } from '@wordpress/block-editor';

const blockStyle = {
    backgroundColor: '#900',
    color: '#fff',
    padding: '20px',
};

registerBlockType( 'gutenberg-hello-world/hello-world-block', {
    title: 'Hello World Block',
    icon: 'universal-access-alt',
    category: 'layout',
    attributes: {
        content: {
            type: 'array',
            source: 'children',
            selector: 'p',
        },
    },
    example: {
        attributes: {
            content: 'Hello World',
        },
    },
    edit(props) {
        const { attributes: { content }, setAttributes, className } = props;
        const onChangeContent = ( newContent ) => {
            setAttributes( { content: newContent } );
        };
        return (
            <RichText
                tagName="p"
                className={ className }
                onChange={ onChangeContent }
                value={ content }
            />
        );
    },
    save: ( props ) => {
        return <RichText.Content tagName="p" value={ props.attributes.content } />;
    },
} );
Output:

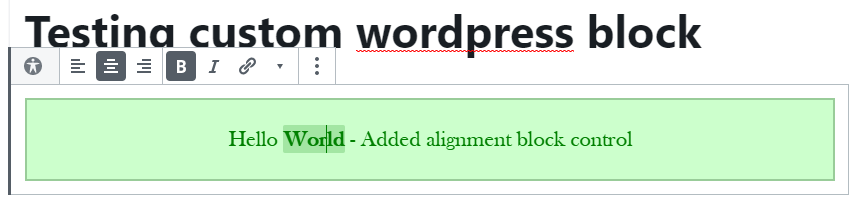
Block Controls – Toolbar and Settings Sidebar
Block toolbar helps to customize the appearance of the element. There are certain default block-level controls available for the rich text component. We can also define other block controls like alignment (from block-editor package) to allow the user to select the alignment (left, right, center etc.) of the text. Update the src/index.js code with following which adds the alignment control. Make sure to compile the code so that the code in build/index.js and build/index.asset.php files are updated as well.
import { registerBlockType } from '@wordpress/blocks';
import {
    RichText,
    AlignmentToolbar,
    BlockControls,
} from '@wordpress/block-editor';

const blockStyle = {
    backgroundColor: '#900',
    color: '#fff',
    padding: '20px',
};

registerBlockType( 'gutenberg-hello-world/hello-world-block', {
    title: 'Hello World Block',
    icon: 'universal-access-alt',
    category: 'layout',
    attributes: {
        content: {
            type: 'array',
            source: 'children',
            selector: 'p',
        },
        alignment: {
            type: 'string',
            default: 'none',
        },
    },
    example: {
        attributes: {
            content: 'Hello World',
            alignment: 'right',
        },
    },
    edit(props) {
        const {
            attributes: {
                content,
                alignment,
            },
            className,
        } = props;
        const onChangeContent = ( newContent ) => {
            setAttributes( { content: newContent } );
        };
        const onChangeAlignment = ( newAlignment ) => {
            props.setAttributes( { alignment: newAlignment === undefined ? 'none' : newAlignment } );
        };
        return (
            <div>
                {
                    <BlockControls>
                        <AlignmentToolbar
                            value={ alignment }
                            onChange={ onChangeAlignment }
                        />
                    </BlockControls>
                }
                <RichText
                    className={ className }
                    style={ { textAlign: alignment } }
                    tagName="p"
                    onChange={ onChangeContent }
                    value={ content }
                />
            </div>
        );
    },
    save: ( props ) => {
        return (
            <RichText.Content
                className={ `gutenberg-hello-world-align-${ props.attributes.alignment }` }
                tagName="p"
                value={ props.attributes.content }
            />
        );
    },
} );
If you want to display the alignment settings inside the settings sidebar then use InspectorControls instead of BlockControls while wrapping the AlignmentToolbar and make sure to import it as well from the block-editor package.
Output:
References:
- https://developer.wordpress.org/block-editor/tutorials/block-tutorial/writing-your-first-block-type/
- https://developer.wordpress.org/block-editor/tutorials/block-tutorial/applying-styles-with-stylesheets/
- https://blog.codoplex.com/javascript-build-setup-for-development-of-wordpress-blocks-nodejs/
- https://developer.wordpress.org/block-editor/tutorials/block-tutorial/introducing-attributes-and-editable-fields/
- https://developer.wordpress.org/block-editor/tutorials/block-tutorial/block-controls-toolbar-and-sidebar/