Views: 86
Wordfence is very powerful and popular WordPress plugin used for the security of WordPress websites as stated on the official website “Wordfence includes an endpoint firewall and malware scanner that were built from the ground up to protect WordPress. Our Threat Defense Feed arms Wordfence with the newest firewall rules, malware signatures and malicious IP addresses it needs to keep your website safe”. The plugin consists of large number of settings which maybe confusing for beginner level users. This guide helps the beginner level users understand and implement the recommended Wordfence settings for WordPress websites.
Wordfence Plugin Installation:
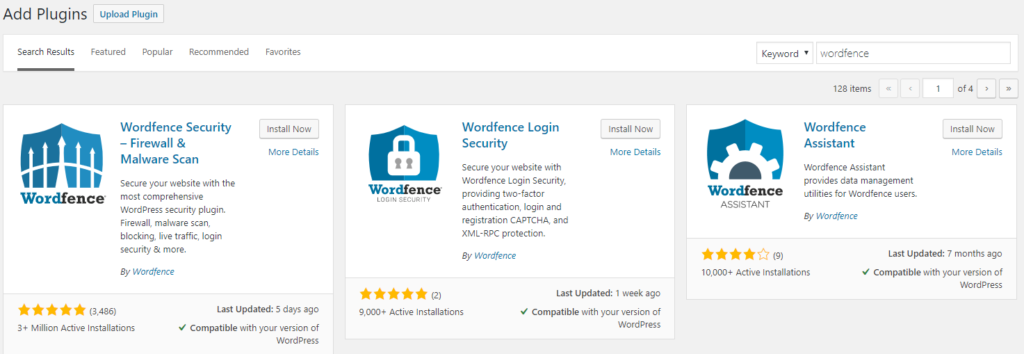
Wordfence plugin can be installed and activated by visiting Plugins -> Add New page inside the left sidebar of the WordPress dashboard, searching for the term wordfence and clicking the Install/Update button. After installation, the activate button can be used to activate the plugin.
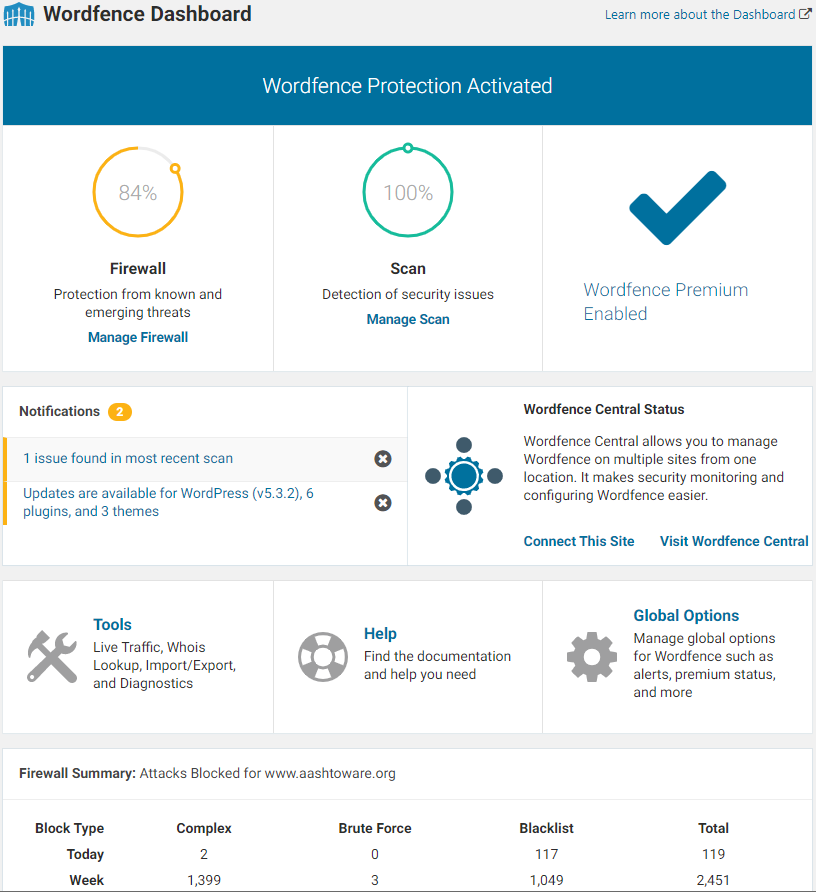
Wordfence Dashboard
Once the plugin is activated, a new menu item “Wordfence” is added in the left sidebar of the WordPress dashboard. Clicking that button will open the Wordfence dashboard page which provides an overview of the security status of the WordPress website, notifications, firewall summary, blocked attacks and links to configure the plugin settings.
Firewall Options – Recommended Wordfence Settings
Wordfence web application firewall (WAF), is an application level firewall used for filtering out the malicious requests to the WordPress website. Wordfence web application firewall implements the rules to mitigate the common attacks (SQL injection, cross site scripting XSS, malicious file upload, directory traversal etc.) targeted on the WordPress core, WordPress themes and plugins.
Wordfence firewall rules help to prevent WordPress website from common attacks by matching the patterns inside the attacks previously marked as the malicious ones. The firewall rules are updated in real time for the users who are using the premium version of the Worfence plugin whereas in the free version the rules are updated after 30 days.
Web Application Firewall Status:
When the plugin is installed first time in the WordPress website, the firewall is in learning mode. Wordfence recommends the learning mode for 7 days to learn about the website and possibilities to protect the website effectively. There are three options available for firewall status i.e. Enabled and Protecting (live), Learning and Disabled (not recommended). There’s also an option available to automatically turn on the Enabled and Protecting option enabled after 7 days of learning mode is ended.
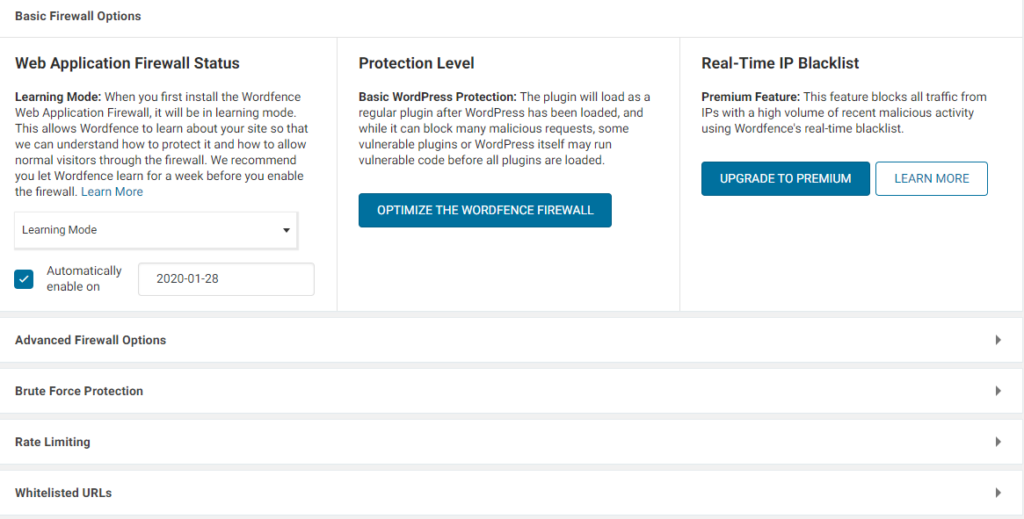
Protection Level:
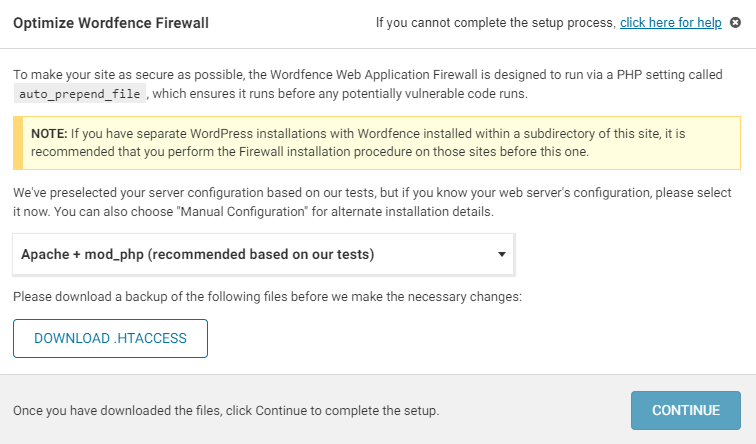
There are two options available for the protection level i.e. Basic WordPress Protection (enabled by default) and Extended Protection. In basic WordPress protection, the Wordfence plugin is loaded normally which still protects the website from most of the attacks but some WordPress core files and plugins are loaded before WordPress which can itself load some vulnerable code. To protect the WordPress website from these kind of attacks, Extended Protection can be used which makes sure that the PHP requests are processed by the firewall before running. Make sure to have a backup of the .htaccess file before enabling the Extended Protection option (the plugin prompts to download the file).
Real Time IP Blacklist:
As the name describes, the real time IP blacklist option (premium feature) allows the Wordfence plugin to automatically block the IP addresses generating high volume of malicious activities. These IP addresses are listed and tracked by the Wordfence plugin data center to prevent websites from the IP addresses generating suspicious traffic.
Advance Firewall Options:
The advanced firewall options, implement extra security settings for extended firewall optimization.
Firewall options:
- Delay IP and Country blocking until after WordPress and plugins have loaded: Turn this option on if there are conflicts with country or IP blocking due to Extended Protection mode. Wordfence do not recommend enabling this option except for testing purpose.
- White-listed IP addresses that bypass all rules: This option can be used to white-list a static IP address to bypass all firewall rules. Word-fence recommends enabling this option only if you are sure that the white-listed IP address is permanent/static. IP address ranges can also be white-listed using this option.
- White-listed services: If your website uses service e.g. Facebook, Sucuri, ManageWp etc. then you might be interested in white-listing these services from firewall rules for continuous and uninterrupted service delivery from the listed sources.
- Immediately block IP’s that access these URLs: This option can be used as a trap for hackers accessing a specific page URL. The page URL’s listed in this option can block the IP address of the visitor trying to access the listed page URL’s. Make sure to avoid visiting these page URL’s yourself because it will block your IP address as well.
- Ignored IP addresses for Wordfence Web Application Firewall alerting: If you are sure about the IP address of a service you are using for scanning or up-time tests then you can add the IP addresses of those services in the Ignored IP Address to list to avoid receiving firewall alerts from the IP address of these services even if they exceed the Rate Limit defined in the rules.
Rules:
The Wordfence Web Application Firewall defines rules to protect the website from known attacks (SQL injection, XSS, file upload etc.) by matching the patterns in the previous attacks. These rules are automatically updated by the Wordfence plugin but in some cases the plugin notifies the admin to manually refresh these rules. The rules can be disabled in case legitimate users are blocked by the rules to perform certain actions.
Brute Force Protection:
Brute Force Protection make sure that the firewall prevents the hacking attempts on the login form by enforcing techniques like login rate limit, strong passwords, login lock time period etc.
Rate Limiting:
Rate Limiting firewall options make sure that the website access is restricted in case of attackers/bots hitting the website for a number increasing the rate limit for unauthorized scanning/scrapping of the website.
Whitelisted URLs:
This option can be used while the plugin is in Learning Mode or by the admin to exclude the URL’s from the firewall rules if the rules even blocks the safe requests to these URL’s.
Monitor Background Requests for False Positives:
Wordfence web firewall can also block some background requests that use XM or AJAX by showing the message “Background Request Blocked”. But it can block some safe requests initiated by certain plugin or theme. This option can be used to disable this background requests blocking feature for front-end of the website, admin panel or both cases in certain scenarios.
Wordfence Scan:
Wordfence scan examines the complete website files, comments, server state, file changes, content safety, password strength etc. looking for malicious code, known malware patterns and insecure URL patterns. At the end a detailed report about the scan is presented with actionable steps to fix the warnings/issues for enhanced protection of the website. Following is a list of key features and settings related to the Wordfence scans.
- Scan status circles shows the current status of the recent scans and prevention capabilities of the Wordfence.
- Wordfence recommends the standard scan type for better scan results and recommendations. The other options are also available for specific scans like limited scan (for restricted hosting resources), high sensitivity (when website is subject to an attack) and custom scan (for manual selection of scan features/settings).
- Reputation checks (premium feature) investigate the website for domain blacklisting, ‘spamvertising’ and if the website’s IP address is generating spammy traffic.
- Scan results are divided into four categories (critical, high, medium and low) depending upon the level of timely response required for the fixation of the specified warning/issue.
- Scan results lists the findings with action buttons like Ignore (to ignore the finding), View File (to view the file having generating the reported issue), View Differences (to see the differences in the modified and actual files if the file is detected as modified), Delete File (to delete the reported file except the WordPress configuration files), Delete All Deletable Files (to bulk delete the reported files generating the issue except the WordPress configuration files) and Mark As Fixed (to mark the reported issue as fixed).
- The detailed list of general scan options is enabled/disabled based on the selected scan type.
Wordfence Tools:
Wordfence provide some useful tools to help investigate the website’s traffic, IP address or domain name, import/export feature and diagnostic information.
- Wordfence provides the tool to investigate the traffic to the website in real time with useful information like location, IP address, time and browser and action links etc.
- Live traffic options can be helpful to track only the traffic which is important for security point of view. There are two options available for live traffic tracking i.e. Security Only and All Traffic.
- Certain know users/resources can even be excluded from the live traffic tracking using the IP address, usernames or other mentioned parameters in the options.
- Live traffic data records can be limited in terms of number of rows and number of days by using the options. Different type of traffic is also differentiated in the categories like bot hits and ghost hits with actionable links.
- Whois Lookup tool can be used to investigate who own a domain name or IP address using a simple input field to enter IP address or domain name.
- Import/Export Options tools can be used to export and import the Wordfence settings of one WordPress website to another WordPress website.
- Diagnostics tool can be used to diagnose the conflicts, configuration and compatibility issues with other plugins and themes.
Wordfence Login Security:
Wordfence provides login security features like Two Factor Authentication (2FA) and reCaptcha validation.
- Two Factor Authentication (2FA) is the most advanced and secure form of authentication system for logging the user into the Website using cell phone or other authenticating devices.
- 2FA is the recommended login security feature and can be configured for specific user roles.
- 2FA can be made mandatory for administrators as well after defined grace period.
- 2FA code verification can be avoided for defined period of 30 days once logged in using the “Allow remembering device for 30 days” settings.
- IP address can be whitelisted to bypass Two Factor Authentication (2FA) using the settings page.
- reCaptcha validation option can also be implemented on the login and registration pages for extended layer of security. reCaptcha validation prevents the bots to hack the login/register forms using the machine generated repetitive requests.
- “Run reCaptcha in Test Mode” option can be used to test the reCaptcha functionality before making it live.
Short Summary – Actionable Steps
Following is the short summary or actionable steps for the implementation of the recommended Wordfence settings.
- Make sure that the “Enabled and Protecting” mode is enabled after the “Learning” period is ended.
- In “Protection Level”, make sure to optimize the Wordfence firewall by enabling the Extended Protection mode.
- Upgrade the plugin to the premium version to enable the “Real Time IP Blacklist” feature to protect the website from malicious activities using the updated and latest database.
- The other default firewall settings are good to start with. These options can be changed in specific scenarios.
- The recommended scan type for most of the cases is “Standard”. The other options can be used in specific scenarios.
- Make sure to upgrade the plugin to the premium to use the latest malware signature during the scans. The free version of the plugin updates the malware signature list after 30 days.
- Moreover, the premium version enables the Reputation Checks (recommended) for ‘spamvertising’, spam identification and domain blacklist checking.
- Make sure the issues reported in the scan results are fixed.
- Wordfence tools like live traffic, whois lookup, import/export and diagnostics are really helpful in diagnosing the website’s traffic, IP address identification, sharing the Wordfence settings among WordPress websites and diagnosing the plugin conflicts or configuration issues respectively.
- Wordfence provide login security tools like Two Factor Authentication (2FA) which is the latest and most secure form of authentication and Google reCaptcha to protect the forms from bot attacks.