Views: 186
Before building complex automations, every developer must first master the fundamental building blocks that make this platform so powerful. In previous episode 01, we setup our local environment and explored the n8n editor. In Episode 02 of our “Zero to Automation Pro” series, we take a hands-on approach to n8n Core Concepts by building your very first “Hello World” automation. We will break down the essential anatomy of nodes, triggers, and parameters, providing you with the structural knowledge needed to transform simple tasks into sophisticated, self-running systems.
n8n Core Concepts
Before building workflows, understand these key concepts:
1. Workflows
- A sequence of connected nodes that execute tasks
- Can be triggered manually, on schedule, or by external events
- Data flows from left to right through the workflow
2. Nodes
- Building blocks of workflows
- Three types:
- Trigger Nodes: Start workflows (webhooks, schedules, manual)
- Action Nodes: Perform tasks (HTTP requests, database queries)
- Logic Nodes: Control flow (IF, Switch, Merge)
3. Connections
- Link nodes together
- Pass data from one node to the next
- Can have multiple input/output connections
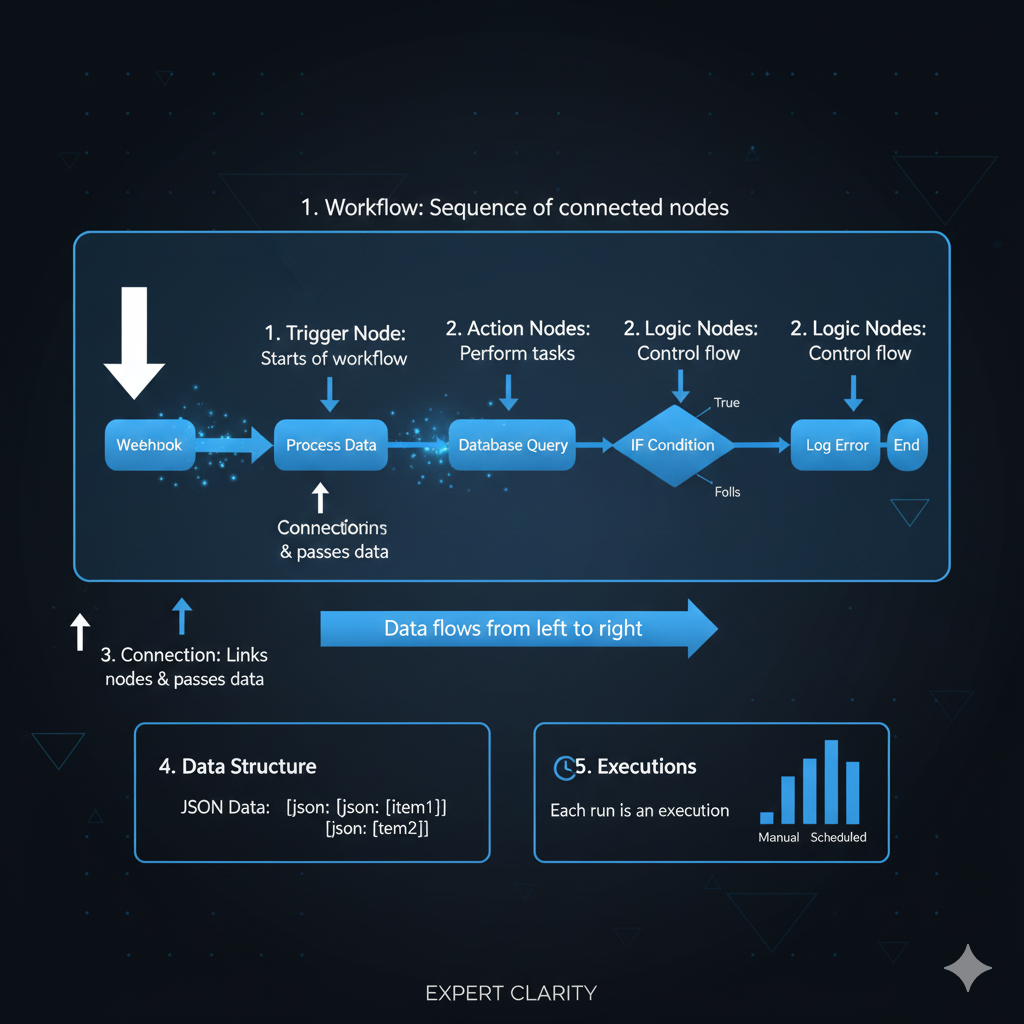
4. Data Structure
- n8n works with JSON data
- Each node receives and outputs items (array of objects)
- Data structure:
[{json: {your: "data"}}, {json: {more: "data"}}]
5. Executions
- Each workflow run is called an execution
- Can be manual (test), triggered, or scheduled
- Executions show the data flow through each node
n8n Interface Walkthrough
Open your n8n at http://localhost:5678
Key Areas:
- Top Bar: Workflow name, save, execute, activate toggle
- Left Sidebar: Node list – search and drag nodes here
- Canvas: Main workflow building area
- Right Panel: Node configuration and data display
- Bottom Bar: Execution history
Your First Workflow: Hello World with Manual Trigger
What it does: Manually triggered workflow that displays a message.
Steps:
- Click “Add workflow” (if you don’t already have a blank canvas)
- Name it: “EP02-HelloWorld”
- Add Manual Trigger:
- Click the “+” button on the canvas
- Search for “Manual Trigger”
- Click to add it
- Add Set Node (for data creation):
- Click the “+” after Manual Trigger
- Search for “Set”
- Click to add
- In the Set node configuration:
- Click “Add Value”
- Choose “String”
- Name:
message - Value:
Hello! Welcome to my n8n automation journey! - Add another value:
- Type: “String”
- Name:
episode - Value:
Episode 1 - Add another:
- Type: “Number”
- Name:
timestamp - Value: Click “Add Expression” and type:
{{DateTime.now().toMillis()}}
- Test Your Workflow:
- Click “Execute Workflow” button (top right)
- Watch the nodes turn green
- Click on the Set node
- View your data in the right panel
- Save:
- Click “Save” button
- The workflow is now saved
Understanding What Happened:
- Manual Trigger: Started the workflow when you clicked execute
- Set Node: Created structured data
- Expression
{{DateTime.now().toMillis()}}: Used n8n’s built-in expression language
Next Episode:
In next episode, we will learn the n8n workflow examples, export options and data flow.
Need Help? If you’re stuck on anything:
- Share your specific error message
- Tell me which step you’re on
- Describe what you expected vs. what happened
I’m here to help you succeed! 🚀
Leave a Reply