Views: 79
Want to capture more leads, promote special offers, or boost engagement on your Weebly website? Learning how to add popup to Weebly is one of the fastest ways to increase conversions without redesigning your entire site.
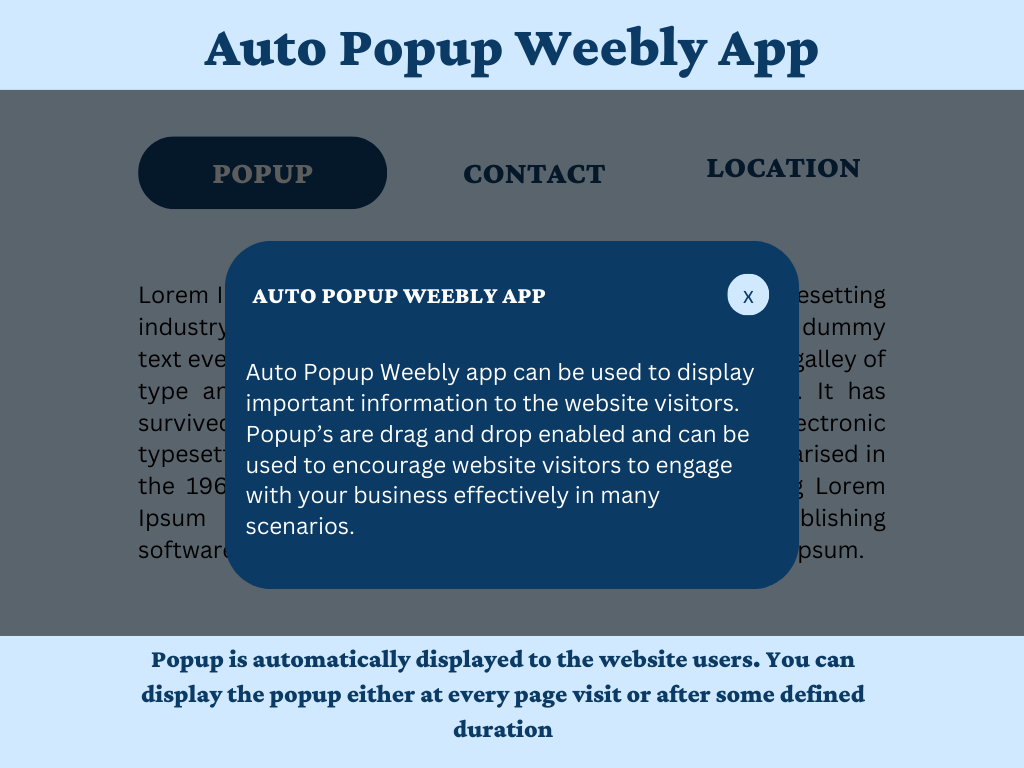
In this comprehensive guide, you’ll discover exactly how to add popup to Weebly using the Auto Popup app, plus best practices for creating popups that convert without annoying your visitors.
What you’ll learn:
- Why popups work for Weebly websites
- How to install and configure a popup in under 2 minutes
- 7 proven popup strategies to grow your business
- Common mistakes to avoid
- Advanced customization tips
Why You Should Add Popup to Weebly Website
Popups are one of the most effective tools for capturing visitor attention and driving specific actions. When used correctly, they can significantly impact your bottom line.
The statistics speak for themselves:
- Well-designed popups convert at 3-5% on average (some achieve 10%+ with proper targeting)
- Email popups can grow your subscriber list 50% faster than sidebar forms
- Exit-intent popups can recover 10-15% of abandoning visitors
- Announcement popups increase awareness of promotions by 300%
For Weebly users specifically, popups solve a common challenge: Weebly’s built-in customization options are somewhat limited. You can’t easily create attention-grabbing announcements or email capture forms that appear automatically. That’s where a dedicated Weebly popup app becomes essential.
What Makes a Good Weebly Popup?
Before we dive into the technical setup, let’s understand what separates effective popups from annoying ones.
Essential Popup Features for Weebly
When you add popup to Weebly, look for these must-have features:
1. Drag-and-Drop Compatibility
Your popup should work seamlessly with Weebly’s drag-and-drop editor. You shouldn’t need to touch a single line of code.
2. Smart Timing Controls
- Wait duration (show popup after X seconds on page)
- Frequency control (don’t show on every single page visit)
- Auto-close options (close automatically after X seconds)
3. Mobile Responsiveness
Over 60% of web traffic is mobile. Your popup must look great on smartphones and tablets.
4. Full Customization
- Colors and opacity
- Size and positioning
- Border styles
- Button designs
5. Flexible Content Options
You should be able to add any Weebly element: forms, images, videos, text, buttons, social media links, etc.
How to Add Popup to Weebly: Step-by-Step Tutorial
Ready to get started? Here’s how to add popup to Weebly website using Auto Popup, the highest-rated popup app in the Weebly App Center.
Step 1: Access the Weebly App Center
- Log in to your Weebly account
- Click on your website to open the editor
- In the left sidebar, click on the Apps icon (looks like a puzzle piece)
- This opens the Weebly App Center
Step 2: Install Auto Popup
- In the App Center search bar, type “Auto Popup“
- Click on the Auto Popup app by Codo Apps
- Click the “Add to Site” button
- Review the pricing ($9.99/year for unlimited use)
- Complete the payment process
- The app will automatically install to your Weebly site
Installation time: Less than 2 minutes
Step 3: Add the Popup Element to Your Page
- Go back to your Weebly editor
- Navigate to the page where you want the popup to appear
- In the Apps section of your left sidebar, you’ll now see Auto Popup
- Drag and drop the Auto Popup element onto your page (usually at the bottom)
Pro Tip: The popup element is invisible on your actual site—it just controls when and how the popup appears. You can place it anywhere on the page.
Step 4: Design Your Popup Content
Here’s where the magic happens. The Auto Popup app creates a dedicated content area where you can add any Weebly element.
- Click on the Auto Popup element you just added
- You’ll see a popup content area appear
- Drag and drop any Weebly elements into this area:
- Text blocks for your message
- Contact forms to capture leads
- Images or videos
- Buttons with links
- Social media icons
- Newsletter signup forms
Example Popup Ideas:
- Email Capture: Headline + Short text + Email form + Submit button
- Announcement: Eye-catching headline + Description + “Learn More” button
- Promotion: Product image + Discount details + “Shop Now” button
- Social Follow: “Connect with us!” + Social media icons
Step 5: Configure Popup Settings
Click the Settings icon (gear icon) on the Auto Popup element to access powerful customization options:
Timing Settings:
- Wait Duration: How many seconds to wait before showing the popup (e.g., 3 seconds)
- Display at Every Page Visit? Toggle on/off
- Repeat Duration: If not showing at every visit, how long to wait between shows (e.g., 60 minutes)
Auto-Close Settings:
- Auto Close Popup? Enable if you want it to close automatically
- Auto Close Duration: How many seconds before auto-closing (e.g., 10 seconds)
Design Customization:
- Background opacity
- Content background color
- Border color and width
- Popup width
- Top margin
- Close button styling (color, padding, border radius)
Step 6: Preview and Test
- Click Preview in the top right of your Weebly editor
- Wait for the popup to appear based on your timing settings
- Test the close button functionality
- Check mobile responsiveness by resizing your browser window
- Test form submissions (if applicable)
Step 7: Publish Your Site
Once you’re happy with your popup:
- Click Publish in the top right
- Your popup is now live!
Total setup time: 2-5 minutes (depending on content complexity)
7 Proven Ways to Use Popups on Your Weebly Website
Now that you know how to add popup to Weebly, let’s explore the most effective ways to use them.
1. Grow Your Email List
Setup: Create a popup with a compelling headline, brief description of your newsletter benefits, and an email signup form.
Best Practices:
- Offer a lead magnet (free guide, discount code, exclusive content)
- Use action-oriented copy: “Get 10% Off Your First Order”
- Keep form fields minimal (just email, or email + name)
- Set repeat duration to 24-48 hours to avoid annoying repeat visitors
Example Copy:
Headline: "Get 10% Off Your First Order!"
Subtext: "Join our community and receive exclusive deals, new product alerts, and style tips."
CTA Button: "Claim My Discount"
2. Announce Limited-Time Promotions
Setup: Feature your sale or special offer with clear imagery and a countdown timer (if applicable).
Best Practices:
- Create urgency with phrases like “Ends Tonight!” or “Limited Stock!”
- Use eye-catching colors that match your sale theme (red for urgency, gold for premium)
- Set auto-close duration to 8-10 seconds
- Link directly to the sale collection or product
3. Showcase Featured Products
Setup: Display your best-selling or new product with an attractive image and “Shop Now” button.
Best Practices:
- Use high-quality product images
- Include a brief benefit statement, not just product name
- Link directly to the product page
- Rotate featured products weekly to keep content fresh
4. Reduce Cart Abandonment
Setup: Use an exit-intent trigger (if available in future updates) or time-delayed popup offering a small discount to encourage purchase completion.
Best Practices:
- Offer 5-10% discount or free shipping
- Create urgency: “Complete your order in the next 10 minutes”
- Keep the offer exclusive to that session
5. Boost Social Media Following
Setup: Create a popup asking visitors to follow you on social media platforms.
Best Practices:
- Explain the value (“Behind-the-scenes content,” “Exclusive giveaways”)
- Include clickable social media icons
- Keep it short and simple
- Set frequency to once per week
6. Collect Feedback or Survey Responses
Setup: Add a simple survey or feedback form to your popup.
Best Practices:
- Ask 1-2 questions maximum
- Offer incentive for completion (entry into giveaway, discount code)
- Use after visitor has spent time on site (wait duration 30-60 seconds)
7. Share Important Announcements
Setup: Communicate business updates, new services, event dates, or policy changes.
Best Practices:
- Use clear, scannable formatting
- Include relevant dates and details
- Add a “Learn More” link if detailed info is elsewhere
- Update regularly to keep information current
Common Mistakes When You Add Popup to Weebly (And How to Avoid Them)
Even with the best popup tool, poor implementation can hurt your results. Here are mistakes to avoid:
Mistake #1: Showing Popup Too Quickly
The Problem: Popup appears immediately when visitor lands on page
Why It’s Bad: Feels intrusive, visitors haven’t had time to engage with your content
The Fix: Set wait duration to at least 3-5 seconds, or 15-30 seconds for exit-intent style
Mistake #2: Displaying on Every Single Page Visit
The Problem: Same visitor sees popup every time they click to a new page
Why It’s Bad: Extremely annoying, increases bounce rate
The Fix: Disable “Display at every page visit” and set repeat duration to 24-48 hours
Mistake #3: Making Content Too Long or Complex
The Problem: Popup has paragraphs of text or multiple form fields
Why It’s Bad: Visitors won’t read it or complete long forms
The Fix: Keep headlines under 10 words, body text under 25 words, forms to 1-2 fields max
Mistake #4: Poor Mobile Experience
The Problem: Popup is too large on mobile, hard to close, or covers entire screen
Why It’s Bad: Mobile users will immediately leave your site
The Fix: Always test on mobile devices, use responsive popup apps like Auto Popup
Mistake #5: Weak or Confusing Call-to-Action
The Problem: Button text says “Submit” or “Click Here”
Why It’s Bad: Doesn’t communicate value or create urgency
The Fix: Use action-oriented CTAs: “Get My Discount,” “Download Free Guide,” “Shop the Sale”
Mistake #6: No Clear Value Proposition
The Problem: Popup asks for email without explaining why
Why It’s Bad: Visitors won’t give their information without a reason
The Fix: Always include a benefit: discount, exclusive content, free resource, early access
Advanced Tips to Maximize Popup Conversions
Once you’ve mastered the basics of how to add popup to Weebly, try these advanced strategies:
A/B Test Your Popup Copy
Change one element at a time and track results:
- Test different headlines
- Try various CTA button colors
- Experiment with offers (10% vs 15% discount)
- Compare timing (3 seconds vs 10 seconds)
Segment Popups by Page
Show different popups on different pages:
- Homepage: General email signup
- Product pages: Related product recommendations
- Blog posts: Content upgrade or newsletter signup
- About page: Social media follow
Use Scarcity and Urgency
Psychological triggers that increase conversions:
- “Only 5 left in stock!”
- “Sale ends in 2 hours”
- “Limited to first 100 subscribers”
Match Popup Design to Your Brand
Consistency builds trust:
- Use your brand colors
- Match fonts to your website
- Keep imagery style consistent
- Maintain your brand voice in copy
Monitor Performance Metrics
Track these key metrics:
- Popup view rate (how many visitors see it)
- Conversion rate (how many take action)
- Bounce rate impact (are popups causing visitors to leave?)
- Email signup rate (if using for lead capture)
Why Auto Popup is the Best Weebly Popup Solution
When researching how to add popup to Weebly, you’ll find several options. Here’s why Auto Popup stands out:
✓ True Drag-and-Drop Integration
Unlike generic popup code that you paste into headers, Auto Popup works natively with Weebly’s editor. Add any Weebly element to your popup content area.
✓ Visitor-Friendly Frequency Controls
The repeat duration feature ensures you don’t annoy visitors by showing the same popup on every page. Set it to appear once per hour, once per day, or once per week.
✓ Complete Customization Without Coding
Adjust every visual aspect through an intuitive settings panel. No CSS or JavaScript knowledge required.
✓ Mobile-First Responsive Design
Automatically adapts to any screen size, ensuring a perfect experience on smartphones, tablets, and desktops.
✓ One-Time Affordable Pricing
At just $9.99/year, it’s one of the most cost-effective solutions in the Weebly App Center. No monthly subscriptions or hidden fees.
✓ Proven Track Record
With 5-star reviews and thousands of active users, Auto Popup is trusted by Weebly site owners worldwide.
✓ Fast, Responsive Support
Questions are answered quickly via direct email, with helpful video tutorials available.
Frequently Asked Questions
Q: Can I add multiple popups to my Weebly website?
A: Yes! You can add the Auto Popup element to multiple pages. Each can have different content, timing, and design settings.
Q: Will popups slow down my Weebly site?
A: Auto Popup is optimized for performance and has minimal impact on page load speed.
Q: Can I use popups for GDPR cookie consent?
A: Yes! You can create a popup with cookie policy text and an acceptance button, though dedicated GDPR apps might offer more compliance features.
Q: What if visitors find my popup annoying?
A: Use the frequency controls! Set a repeat duration of 24-48 hours so visitors only see it once per day or less. Also, ensure your close button is clearly visible.
Q: Can I schedule popups to appear only during sales?
A: Currently, you’d need to manually enable/disable the popup or change its content. For automated scheduling, you might need additional tools.
Q: Will popups work on my Weebly e-commerce store?
A: Absolutely! Popups are particularly effective for e-commerce, whether for email capture, announcing sales, or showcasing products.
Conclusion: Start Using Popups on Your Weebly Site Today
Learning how to add popup to Weebly is one of the simplest yet most impactful improvements you can make to your website. Whether you want to grow your email list, promote special offers, or boost engagement, popups deliver results when implemented correctly.
Quick Recap:
- Install Auto Popup from the Weebly App Center ($9.99/year)
- Drag the popup element onto your page
- Design your popup content with Weebly’s drag-and-drop editor
- Configure timing and display settings
- Customize the design to match your brand
- Preview, test, and publish
With the right strategy and tools, you can create popups that enhance user experience while driving meaningful business results.
Ready to get started? Add Auto Popup to your Weebly site →
Related Articles:
- How to add beautifully designed colored lines on Weebly website
- Best way to add YouTube or Vimeo videos on your Weebly website
Last Updated: February 2026 | Reading Time: 12 minutes
Leave a Reply